Let’s cut to the chase: “vermicomposting,” which is composting in a bin with red wiggler worms, is not icky. Done properly, it is also not difficult or smelly or messy.
Sure, you have to follow some basic do’s and don’ts. Don’t keep your worm bin and its contents too wet or too dry. Do keep it at temperatures that are comfortable for you… maybe mid-50’s to low-80’s. And don’t feed your worms more kitchen scraps than they can eat and recycle fairly quickly.
If you can do that, your worms will convert your kitchen “garbage” into some of the most amazingly rich and wonderful fertilizer you could hope for. As a bonus, the whole recycling process is a wonder to behold… a microcosm of how Mother Nature has designed a healthy ecosystem to work. If there are children in your world, the phrase “teachable moment” will come to life every time you open the bin to feed the worms or harvest the results of their labor.
What is a “red wiggler?”
Red wiggler worms are the same worms we often see crawling out onto sidewalks and driveways after a heavy rain.

Worms “breathe” (or more correctly exchange oxygen) through their skin. When they’re surrounded by too much water, they can drown. They come to the surface for air. But because their skin has to be moist to take in the oxygen, once they dry out, they suffocate and die.
The red wiggler pictured above was one of a couple hundred worms that crawled out on my driveway after a heavy rain. I did my best to pick them up and set then back onto the flower bed so they could return to the safety of the soil.

Tagawa’s carries tubs of the red wigglers. The “reds” are much smaller than nightcrawlers. The red wigglers live in the upper level of the soil while the night crawlers work much deeper. It’s definitely the red wigglers you want for vermicomposting.
Where should you begin?
My favorite container for vermicomposting is a sturdy 18-gallon plastic tub with handles and a well-fitting lid. A full tub of moist vermicompost is quite dense and can be heavier than you might think. That’s where the handles come in.
The worms naturally avoid daylight, so resist the temptation to get a clear bin. It won’t necessarily slow down the vermicomposting process, but you won’t see the worms in action. They’ll be working inside the bedding, away from the see-through sides of their home.
Drill about fifteen 1/4″ holes on the bottom and lower sides of the bin to create some ventilation. The worms will not want to crawl out of their home unless something is very wrong with the conditions inside.
I always try to buy two lids when I get a new bin. I use the second lid as a saucer to catch any drippings that come from the bin. You may see some moisture leaking out, but you shouldn’t get that much unless the bin is too wet.
Bedding? My worms need a bed?
“Bedding” refers to the material used to create a cozy home for your worms, like bedding inside a stall for a horse (or in my case, burros, but that’s another story.)
Fall is the purr-fect time of year to collect leaves for worm bedding. Every fall, I gather and store a few extra trash bags or bins full of dried leaves to use during the coming year. Be sure to let the leaves dry completely before you seal them up or you could have a smelly mess when you go to use them.
Newspaper also makes great bedding. Tear the paper into narrow strips about an inch wide and the length of the longest dimension of the paper. Note: If you tear with the grain of the newsprint, you’ll get long, continuous strips. If you tear against the grain, you’ll get annoying little pieces. Go for the strips.
Don’t worry about the colored ink. It’s all soy-based and won’t hurt the worms. Do avoid the shiny supplements. Their slick finish tends to repel moisture, making it hard for the decomposition process to begin.

My favorite bedding is a combination of newspapers and dried leaves. We can’t see it, but the leaves are coated with a lovely array of beneficial microorganisms. Introduce some moisture and those little microscopic decomposers will help jump-start the breakdown of the bedding and the kitchen waste inside the bin.
Some people ask if they can use shredded office paper as bedding. You can use a bit, but not a lot. The paper has been bleached to make it white, which will slow down the decomposition process a bit. That shredded mass is also prone to glopping together. Mix it in, in smallish amounts, with the newspaper and leaves and you’ll be fine. But large amounts of office paper will create problems.
Conditioning the bedding
Gather enough dry bedding to fill your 18-gallon bin about two-thirds full. Bedding that’s more than 18″ deep can get heavy and make it harder for the worms to move about.
Remember when I said earlier that the worms in the ground need a moist, but never a soggy environment to thrive? That’s why we need to moisten the bedding before we add the worms. Use a spare (water-tight) bin, a bucket, a garbage can…. whatever’s handy, to moisten your dry bedding. Add a fair bit of water and stir it into the bedding, then let it sit for a while to absorb the moisture. Drain off any excess water.
The #1 Rule of Composting
Whether you’re composting in a worm bin or in a conventional pile, the mantra is to keep your compost as moist as a wrung-out sponge.
Think about it. If you have a sponge and you wring out the moisture, it still feels very damp. It’s not dripping, but you can easily tell that it’s wet. It leaves a glisten of moisture on your hand. That’s how you want your worm bedding to feel when you start your bin and during the weeks that it takes for the worms to break down all of the contents. Not too wet. Not too dry.
Properly moistened bedding will still be fluffy and open. It’s not packed down into heavy layers of leaves and newspapers. It has plenty of air pockets.
Let the worms begin…
When you have your bedding mixed and moistened, lay a few sheets of newspaper flat onto the inside bottom of the bin to help catch excess moisture. Add the bedding, then pull back a few inches of the leaves/newspaper mix and tuck your worms into a little pocket of the new home. Cover them back over with bedding, and lay a few more sheets of newspaper flat over the top. That will help keep the bedding moist. Put the lid on and walk away.
Hold off feeding the worms for a week or so to let them settle in. Remember, when they’re not eating your kitchen waste, they’re eating their bedding. With fresh bedding, it would take a very long time for your worms to starve.
What to feed your hard-working worms
There are a few types of food scraps you should avoid. No meat or bones. No dairy or fatty/oily foods like cheese or gravy. (The worms will appreciate some dried, crushed eggshells to help with their digestion.) No hot peppers or super-spicy foods like hot peppers. A little bit of citrus like orange peel is okay, but the acid can build up, so I just avoid it. Go easy on anything salty. Broccoli and onion scraps can give off odors even in properly maintained bins. A no pet waste.
My favorite additions are banana peels (minus any plastic labels), melon rind and avocados. The worms adore avocados, so when I have one that gets too soft for me to eat, I just cut it in half and tuck the two pieces down into the bedding, seed and all. If I check a few days later, there they are, inside the avocado skin, having an out and out worm feeding frenzy. What fun! And it’s not at all uncommon for the avocado seed to sprout, even in the dark!
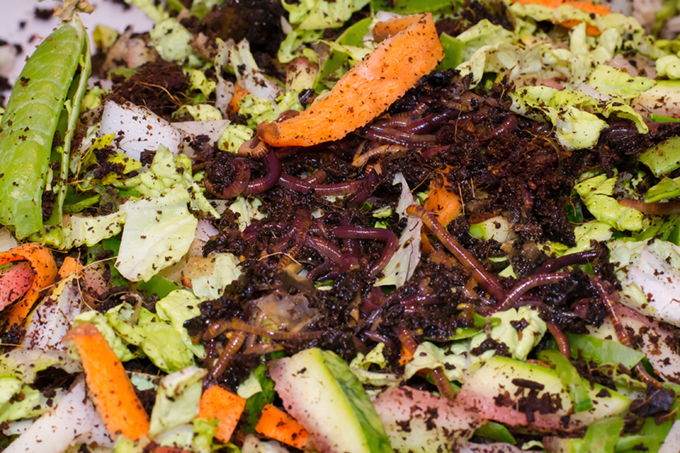
All in all, the best vermicompost (the “gardening gold” I spoke of in the title of this blog) comes from a combination of nutritious foods like fruit and vegetable scraps, bread, stale cereals, pasta that’s been rinsed. You get the idea.

I like to make what I call “worm salad.” The smaller the pieces of worm salad, the faster the worms and other decomposers will be able to break it down. Collect the scraps in a plastic bag and store in the frig ’til you have enough for a good meal.
How much food… and how often?
This is important. The rule of thumb is to feed your worms a cup or two of food, then don’t feed again until that food has virtually disappeared…. until it’s no longer recognizable as what it was.
Always bury the food from each feeding in a little pocket, about half-way down in the bedding. Don’t scatter it around. Let the worms find it. And never leave it exposed on top of the bedding. That’s a great way to encourage flies, which should never be a problem in a properly maintained worm bin.
Keep the lid on tight, and let your worms go to town. Check a week or so later and see how much of the pocket of food has been consumed/decomposed. As the population of worms in your bin increases, they’ll eat more food and they’ll eat it faster. Feed them too much food too quickly, and that excess food will just sit there and turn sour. Yuk!
As the bin matures, if the bedding dries out and no longer feels “as moist as a wrung-out sponge,” add some water. If the bedding gets too wet, add some dried leaves or dry strips of newspaper and gently mix the bedding. Very wet foods like lettuce should be balanced out with drier foods like bread.
Healthy worm bins smell like a moist forest floor…. earthy and pleasant. A stinky worm bin has been kept way too wet. The worms and every other critter in the team of decomposers will die.
Springtails?
A note on “springtails.” One of the worms’ most helpful fellow decomposers is a very tiny little white insect called a springtail. A healthy worm bin will have them by the thousands… maybe even the zillions. They’re a good thing! They’ll die outside the warmth and moisture of the bin. They will not infest your house! Not to worry!!!
When to harvest
Once most of the bedding is no longer recognizable as leaves or newspapers, slow down on the feeding. When I’m ready to harvest my two bins, I pull out big handfuls of compost, worms and all. I lay it out in waterproof trays and make little windrows. I leave the trays alone and uncovered for a day or two in natural daylight, but never direct sunlight.
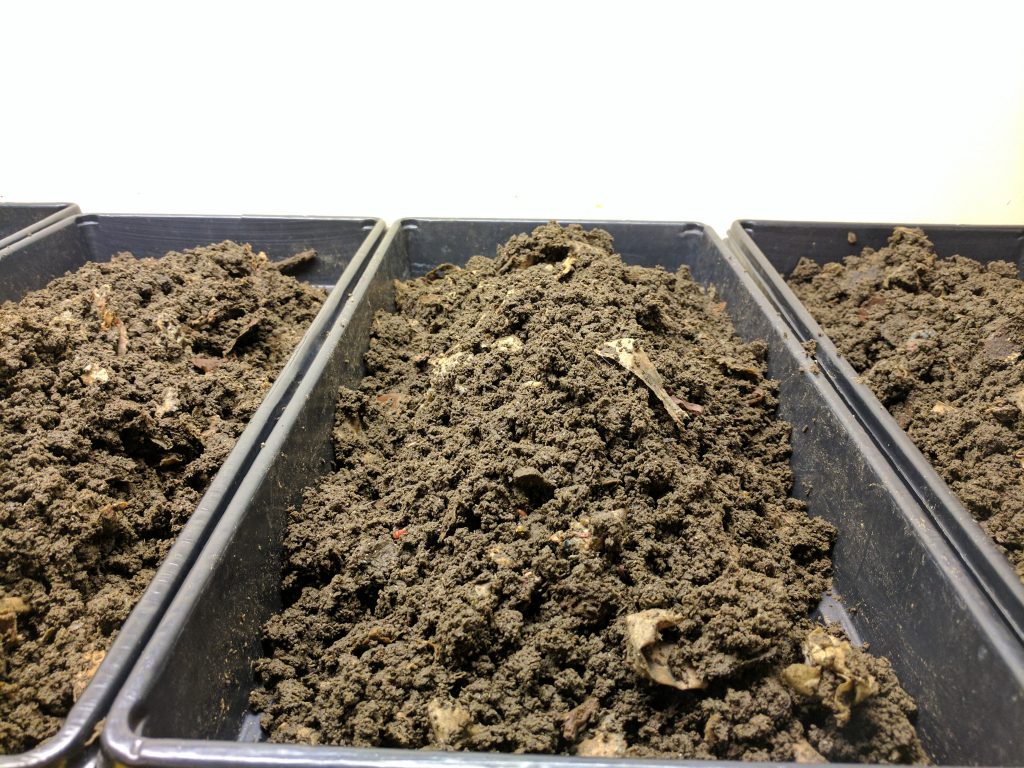
Preferring the dark inside the vermicompost to the light of the room, the majority of the worms will disappear down to the bottom of the trays. That makes it easier to pick off the “finished” vermicompost on top of the windrows, set it aside to finish air drying, and pick the worms out of the remaining compost. Any undecomposed bits of food or bedding can go back into the new bin with fresh bedding.
Some people don’t bother separating out the worms. They just store the finished vermicompost until they’re ready to use it in their garden and buy new worms for the next batch. I like my worms a lot, and have no problem taking the time to pick them out and install them in a new bin with new, fresh bedding. As you’re picking out the worms and setting them aside in a bowl or tub, give them a little spare bedding to hide under. They really don’t like being out in the light. Have the moistened bedding ready for the new bin as you’re harvesting the old one, and tuck the worms inside the next home.
Your reward: Gardening Gold!
Once the harvested vermicompost has completely finished air drying, seal it up and keep it cool and dry ’til you’re ready to use it in the garden. It’s potent stuff, so go easy. I always add a tablespoon of vermicompost to each clove of garlic that I plant. Boy, do I have great garlic! I also mix a quarter-cup or so of vermicompost into the planting holes of my tomatoes.
Unless you’re scrupulously careful about minimizing your food waste, one worm bin won’t take care of all of your kitchen scraps. A conventional compost pile is the place for that.
But having a worm bin is a great way to recycle smaller amounts of kitchen waste, leaves and newspapers and convert them into a power-packed food for your hungry garden!
Have fun, and tell your worms I said “hey!”