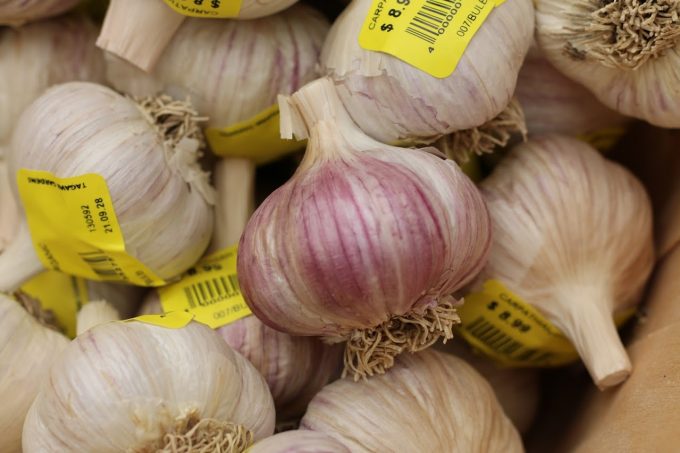
There’s garlic, and then there’s home-grown gourmet garlic. One look at our garlic display and you’ll see the difference! And hopefully, after reading this blog, you’ll be convinced that with just a little effort, you can harvest a garlic crop of your own!
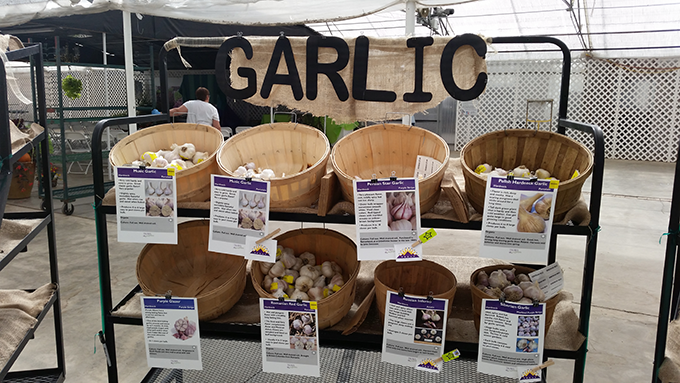
Tagawa’s gourmet varieties of garlic bear little resemblance to the traditional one-size-fits-all garlic you might be used to. Our more than 30 varieties of gourmet garlic are in a league of their own. Some of the varieties are in short supply, so shopping early is a must!
The tough part about growing garlic is choosing which varieties to grow. The gourmet garlic we carry has names as exotic as the bulbs are beautiful! “Ajo Rojo” is “mild and creamy baked, but watch out raw!” “Silver Rose” has “rose-colored cloves with a rich, musky mild flavor.” And Russian Red? Expect “…raw heat balanced by a deep, rich flavor with sweet undertones.” Tagawa’s truly is a garlic-grower’s paradise!

Tagawa’s garlic display includes pictures and detailed flavor information about each strain. It’s helpful to take a picture of the signs showing the varieties you choose so you know what to expect.
The time to plant garlic in Colorado is now!
Garlic loves Colorado because our winters give it the cold period it needs before it starts growing in earnest next spring. Planting in early fall gets the individual cloves into the ground while the soil is still warm. The warm soil will encourage early root growth and give your garlic plants a chance to establish themselves before winter sets in.
Plant your garlic in a sunny spot. At least six hours of full sun is ideal. Less sun will produce smaller bulbs.
Work a couple of inches of compost and some good quality bulb food into the bed before you plant. Garlic requires rich, loose well-drained soil. I grow my garlic in raised beds to help overcome the challenges of Colorado’s clay soil.
Remember how I said choosing the variety was the toughest part?
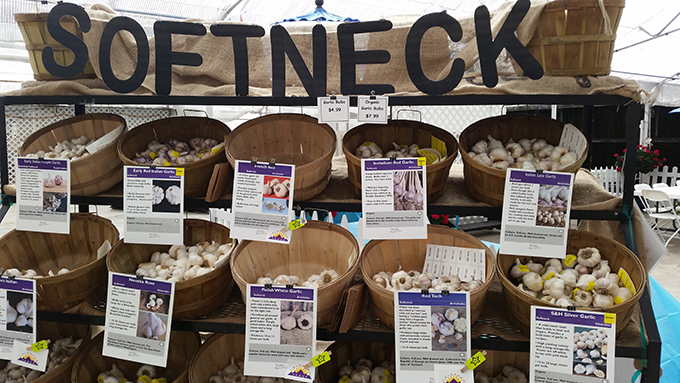
Garlic comes in two basic types: “soft neck” and “hard neck.”
The stems of soft necks are pliable and can be used to make garlic braids. Very mild, some would say less interesting varieties of soft neck are what you usually find in the grocery stores.
Soft necks have thicker skins and can be a bit more difficult to peel, but those heavier skins also give the soft necks a longer shelf life, averaging around five to six months if stored properly.
The “hard neck” varieties of garlic tend to have more intense, complicated flavor and often have beautiful purple coloring. Their stem is woody, and usually produces a flower stalk called a “scape.” This wonderful tall flower spike will often turn into a complete curlicue after it emerges in the spring.
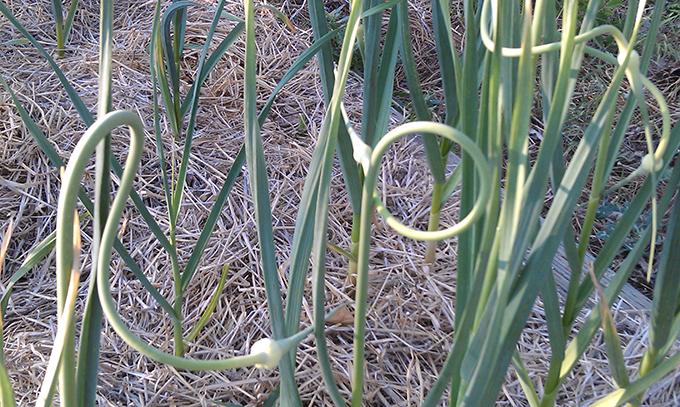
Some professional garlic growers say removing the scapes at the base of each stem before they mature will divert more of the plant’s energy toward making bigger bulbs. The harvested scapes are full of nice garlic flavor and make great additions to dishes like stir-fry. It’s best not to let the mature seeds spread on their own in your garden. You could end of with dozens of tiny garlic plants where you may not want them.
Hard neck garlic has a thinner outer skin than soft necks. That makes them easier to peel but also reduces their shelf life because they can dry out faster. Hard necks will keep for an average of three to five months if stored in a cool, (but not cold), dark and airy place.
Plant the lovely cloves pointing up to the sky
When it’s time to plant, now into late October, break the bulbs apart gently. Open or “crack” the bulbs when you’re ready to plant and not before. You don’t want the individual cloves to begin to dry out before they go into the soil.
Plant only the largest, plumpest cloves. The bigger the clove, the bigger the bulb it will produce. Tuck the cloves into your prepared site with the pointy side up, sitting about three inches below the finished soil level. Plant the cloves four- to six inches apart. Planting them closer makes it difficult to dig them free at harvest without damaging adjacent plants.
Be sure to mark the rows or beds as you plant with something sturdy that will identify which variety is which. I use and re-use old-fashioned wooden survey stakes. When they’re pounded well into the ground, they stand up to winter weather. Give them a fresh coat of white spray paint after each harvest and they’re good as new.
Water the bed deeply once you’re done planting. That will help settle the soil around each clove and get them off to a good start while the soil is still warm.
Initially, leave the beds uncovered and well-watered, then mulch the beds heavily as colder weather sets in. I use a four-to-six-inch layer of pine needles or straw. Completely dried-out leaves will work, too. The point is to mulch the beds with something that won’t compress, so moisture can get through to the plants. The mulch will keep the bed insulated over the winter and help discourage weeds next spring. Garlic does not like to share its space with weeds!
If the winter weather is dry, I’ll drag a hose down to my garlic beds on mild mornings and give them a good drink. The garlic’s top growth may be taking a break, but the little plants below ground can’t be allowed to dry out completely. Remember to apply enough water to soak through the mulch and into the soil several inches deep. Water thoroughly, then gently lift the edge of the mulch and poke down into the soil to make sure the moisture is penetrating down to the garlic plants’ root zone.
Need some help planting? Here is our garlic planting video featuring Kris, from Huckle-beary Homestead!
Spring and early-summer care
Proper watering throughout its growing season is critical for a good garlic crop. I made a point to water my beds especially deeply and consistently this past spring and summer. As a result, I grew the largest bulbs my garden had ever produced. Certain varieties were easily the size of a large plum! Without deep and fairly frequent watering, your bulbs will suffer in both size and taste.
Bring on the harvest!
First-time garlic growers can do everything just right and then drop the ball when it comes to harvesting, so here’s the scoop on when and how to bring in your crop.
Most garlic grown along the Front Range will be maturing in mid-to-late July. Because of this summer’s heat, some of my garlic was ready to harvest a couple of weeks earlier than normal. Some varieties may mature faster than others, but mid-summer is generally a reliable time frame.
You don’t want to leave any of them in the ground too long or they’ll mature so much that they split open into separate cloves. That makes them much harder to harvest and they won’t store nearly as well.
Start gradually cutting back on your watering two to three weeks before harvest so the bulbs can begin to harden. When the lowest one-third of the plant’s leaves begin to turn yellow, the plant is starting to shut down. When those lower leaves dry completely, the bulbs are ready.
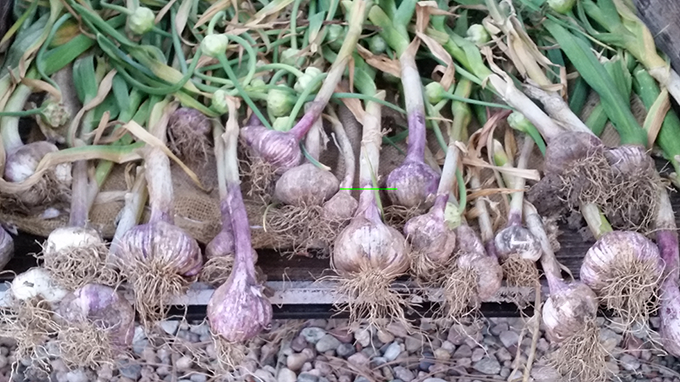
Unless you have truly exceptional soil, (a rarity in Colorado), never try to harvest your garlic by pulling it from the ground! Instead, use a garden fork or a small spade to gently pry up the bulbs and then lift them out.
Go slowly. Be careful to dig between the plants so you don’t skewer the bulbs themselves. Damaging them is easier than you might think. It’s painful to lift out a big, beautiful bulb that’s been sliced open during harvest.
Once they’re up, don’t leave the harvested bulbs lying in our hot Colorado sun. The bulbs are very tender at this stage and can sunburn easily. If I’m harvesting on a hot sunny day, I’ll often lay the bulbs in a large tray or tub and cover the whole thing with a towel to keep it shaded until I’m done.
The last step…
Working out of the sun, gently remove most of the loose soil, trying not to disturb the outer papery skin of each bulb. Never wash the garlic! You’ll just slow down the curing process.
Leave the garlic bulbs, stems, and roots intact while they cure. You can tie several of the plants together in a bundle and hang them in an out-of-the-way place or lay them out flat. Cure them out of the direct sun in an open, airy location. Proper curing improves the flavor and increases shelf life significantly.
In a few weeks, all of the leaves and the stalks should be dry and brittle. That’s when you can cut the stem down to within an inch of the bulb and trim the roots.
Store your garlic whole in mesh bags in a cool place…. never in the refrigerator! Or start giving them away and earn the love and devotion of friends and family.
Remember to save the bulbs with the biggest, fattest cloves to use as seed garlic for the next crop. Or, if you use or give it all away, simply come see us again at Tagawa’s to start this garlic adventure all over again!
If you would like to actually see the above mentioned steps for harvesting, here is our video about Harvesting Garlic!